How to Tell if a Dress Shirt Is Worth Tailoring
How to Tell If a Dress Shirt Is Worth Tailoring
Let’s say you’re tired of wearing poor fitting dress shirts. You come across my content and learn that you can tailor them yourself, and that it’s WAY easier than you realized.
So you find a dress shirt you really like, put it on, and from the chest up everything seems pretty decent. Shoulders aren’t terrible. Collar isn’t doing anything too crazy.
Then you look down.
It’s baggy enough around your waist to hide a keg. So naturally you think, “Alright, I can tailor this.”
Maybe. But maybe not…
Before you start attacking every shirt in your closet with sewing pins and completely unjustified confidence, there’s something I want to tell you.
Some dress shirts are GREAT candidates for tailoring. Other shirts can technically be altered, but you’re going to fight that thing the entire way…and after all that work, its still going to look stupid.

So the real question isn’t:
“Can I tailor this shirt?”
It’s:
“Is this shirt even worth tailoring?”
And luckily, there’s a really easy way to figure that out.
The Shirt Has to Give You Something to Work With
Here’s basically the whole game.
You want the hard-to-change parts of the shirt to already fit pretty well, while the easy-to-change parts are the ones that suck.
The three biggest things I want you checking are:
Shoulders
Collar
Chest
Those are the areas I really don’t want to mess with if I don’t have to.
If your shoulders fit, your collar fits, and you have enough room through your chest, but the waist looks like a parachute?
Beautiful.
We can fix that.
If your sleeves are a little too wide or too long?
We can fix that too.
Taking in the side seams, adding darts, slimming the sleeves, and shortening sleeves are all easy alterations you an learn super quick, like within a weekend.
But if the shoulder seams are halfway down your arms, the collar is choking you, and the buttons across your chest look like they’re about to launch across the room?
Nah bro.
At that point you’re not really tailoring the shirt anymore. You’re trying to rebuild the damn thing.
And for most beginners, that’s a big no bueno.
Easy Problems vs. Annoying Problems
Some fit problems are pretty straightforward.
A shirt being too loose around the waist? Easy enough.
Too much fabric around your lower back? Add some darts.
Sleeves a little too wide? Slim them down.
Sleeves slightly too long? Shorten them.
Those are great because you’re fixing one problem without changing anything else. Everything else already works.
Then there are the other alterations.
Narrowing shoulders.
Making a tight chest dramatically larger.
Resizing a collar.
Rebuilding armholes.
Reconstructing a box pleat.
Can those things be done?
Sure I guess.
A skilled tailor can perform all kinds of garment surgery.
But you’re probably not trying to perform open heart surgery on a $24 Target dress shirt.
You want to make a few smart changes that create a BIG improvement in how the shirt fits.
That starts with picking the right shirt.

1. Check the Shoulder Seams
First thing you should absolutely check is the shoulders.
More specifically, look at where the shoulder seam is sitting.
That’s the seam running from around your upper arm. Basically, it’s where the body of the shirt meets the sleeve.
Put the shirt on and look at where that seam ends.
Ideally, you want it landing somewhere around the outside edge of your actual shoulder, right before your shoulder starts curving down into your upper arm.
Don’t drive yourself insane trying to find some scientifically perfect millimeter. It doesn’t need to be exact by any means.
Different shirts are built differently, and human shoulders aren’t perfectly square. Unless you’re a guy I knew in high school named Kyle G. You know who you are.
You just want that seam somewhere in the general neighborhood.
What Does a Shoulder That’s Too Big Look Like?
Oh you’ll know. If that shoulder seam is hanging stupidly far down your upper arm, the shirt is way too wide across the shoulders.
You’ll usually notice a few other things too.
The sleeves start too low.
Your shirt probably has really low arm holes.
The whole upper part of the shirt looks all droopy and sad.
This is where beginners can get themselves into trouble.
They look in the mirror and immediately notice all that extra fabric around the stomach.
So they think:
“Oh, I’ll just take in the sides.”
Then they do.
And the waist looks fantastic.
Except the shoulder seams are still halfway down their arms.
Now you’ve got a shirt that looks nice and fitted around the stomach but three sizes too big around the shoulders.
That combination looks weird as hell. I did that one time with a Henley style long sleeve shirt. I thought the shirt looked great at the time. Looking back on it I looked so damn stupid…
Taking in the side seams won’t fix it, because the side seams were never the real problem.
Can You Make the Shoulders Narrower?
Technically?
Yep.
Would I recommend doing that on your first few shirts?
Hell no.
To properly fix the shoulders, you have to take the sleeves off, reshape the shoulder area, reshape the armholes, cut away extra fabric, and then sew everything back on.
And those sleeves need to go back in without twisting, puckering, bunching, or making your arms look like they’re pointing in two different emotional directions.
Good luck with that.
If the shoulders are just slightly off you can probably still work with the shirt.
But if those seams are clearly hanging down your arms?
Leave it alone.
Find a shirt that fits your shoulders better.

2. Button the Collar
Next, button the shirt all the way up.
Yes, even the top button.
And I know what some of you are thinking:
“I don’t wear ties. Why do I care if the top button closes?”
Because it gives you a really useful clue about whether the shirt is actually the right size around your neck and upper body.
With the collar buttoned, you should be able to comfortably fit about one or two fingers between your neck and the collar.
You want at least a little room.
You do NOT want that thing squeezing your neck like you owe it money.
But you also shouldn’t be able to fit your whole hand inside there and start waving.
What If the Collar Is Too Small?
If getting that top button closed feels like a physical challenge, the shirt isn’t worth tailoring.
And sure, you can just leave it unbuttoned if you’re wearing the shirt casually, which I do regularly.
But it’s still useful information about the overall fit of the shirt too.
A collar that’s way too tight can also be a clue that the upper chest or shoulders? Yeah those are too small as well.
So even if you’re never going to wear the shirt buttoned all the way up, check it anyway.
What If the Collar Is Too Big?
If the collar is floating around your neck like John Travolta then just don’t.
This happens all the time when guys size up because they want more room around their stomach.
You solve one problem…
…but create five new ones.
Now sure it fits better in the stomach, but the collar is massive the shoulders are 8 inches from where they should be, the sleeves are too long, and everything through the upper body looks terrible.
Why Not Just Make the Collar Smaller?
Because collars are super annoying and not beginner friendly at all.
A dress shirt collar isn’t just a loose piece of fabric folded over the top of the shirt.
There’s a ton of layers in there, and everything connects to the neckline and collar band.
To resize one properly, you have to remove the collar, reshape the neckline, alter the collar band, and then put everything back together evenly.
And if you get it wrong?
Yep…sewing machine gets thrown at the wall.
Check the Chest — And Watch Those Buttons
Now button the shirt normally and look at the chest. You want the fabric sitting fairly smooth across your chest without being stretched tight like salami.
The buttons should lay flat. And that strip of fabric running vertically underneath the buttons — called the button placket — you want that to stay straight.
Then move around.
Don’t just stand there like you’re taking a passport photo. Reach your arms forward like you’re grabbing a steering wheel.
Lift your arms. Pull your shoulders back. Sit down. Move around like a normal human being. Watch what the shirt does.
If you see horizontal wrinkles shooting outward from the buttons, little gaps opening between the buttons, or the entire button placket twisting and pulling…
Yeah, the chest is probably too tight and you’re gonna have a bad time.
You might also feel the armholes or upper sleeves digging into you when you reach forward.
And here’s a good rule:
If the shirt only fits when you’re standing completely still, it doesn’t fit. You shouldn’t need to spend your whole day standing like a mannequin because one deep breath might send a button across the room.
Can You Make a Tight Chest Bigger?
Usually not by very much.
Here’s why.
To make clothing smaller, we can remove fabric.
Easy.
To make it BIGGER, we need extra fabric somewhere. That extra fabric usually comes from the seam allowance. The seam allowance is basically the extra strip of fabric sitting inside the garment beyond the stitch line. Sometimes there’s enough extra material inside the seams to let a garment out a little.
But most mass-produced dress shirts aren’t hiding two extra inches of fabric inside there for you. Manufacturers are trying to make thousands of shirts efficiently.
They’re not thinking: “Let’s stash a bunch of bonus material inside this thing in case SD wants to rebuild it in three years.”
So if the chest is already noticeably tight, assume you won’t be able to make it dramatically bigger.
What Does a GOOD Chest Fit Look Like?
This is basically my dream scenario:
Chest fits comfortably. Buttons aren’t pulling. You can reach forward. Shoulders feel good. Then you get below the chest…
…and the shirt suddenly balloons out around your stomach and lower back.
YES.
That’s exactly what we want. Because now the hard part already fits. We just need to remove some of the extra fabric from the easy part. That’s a GREAT shirt to tailor.
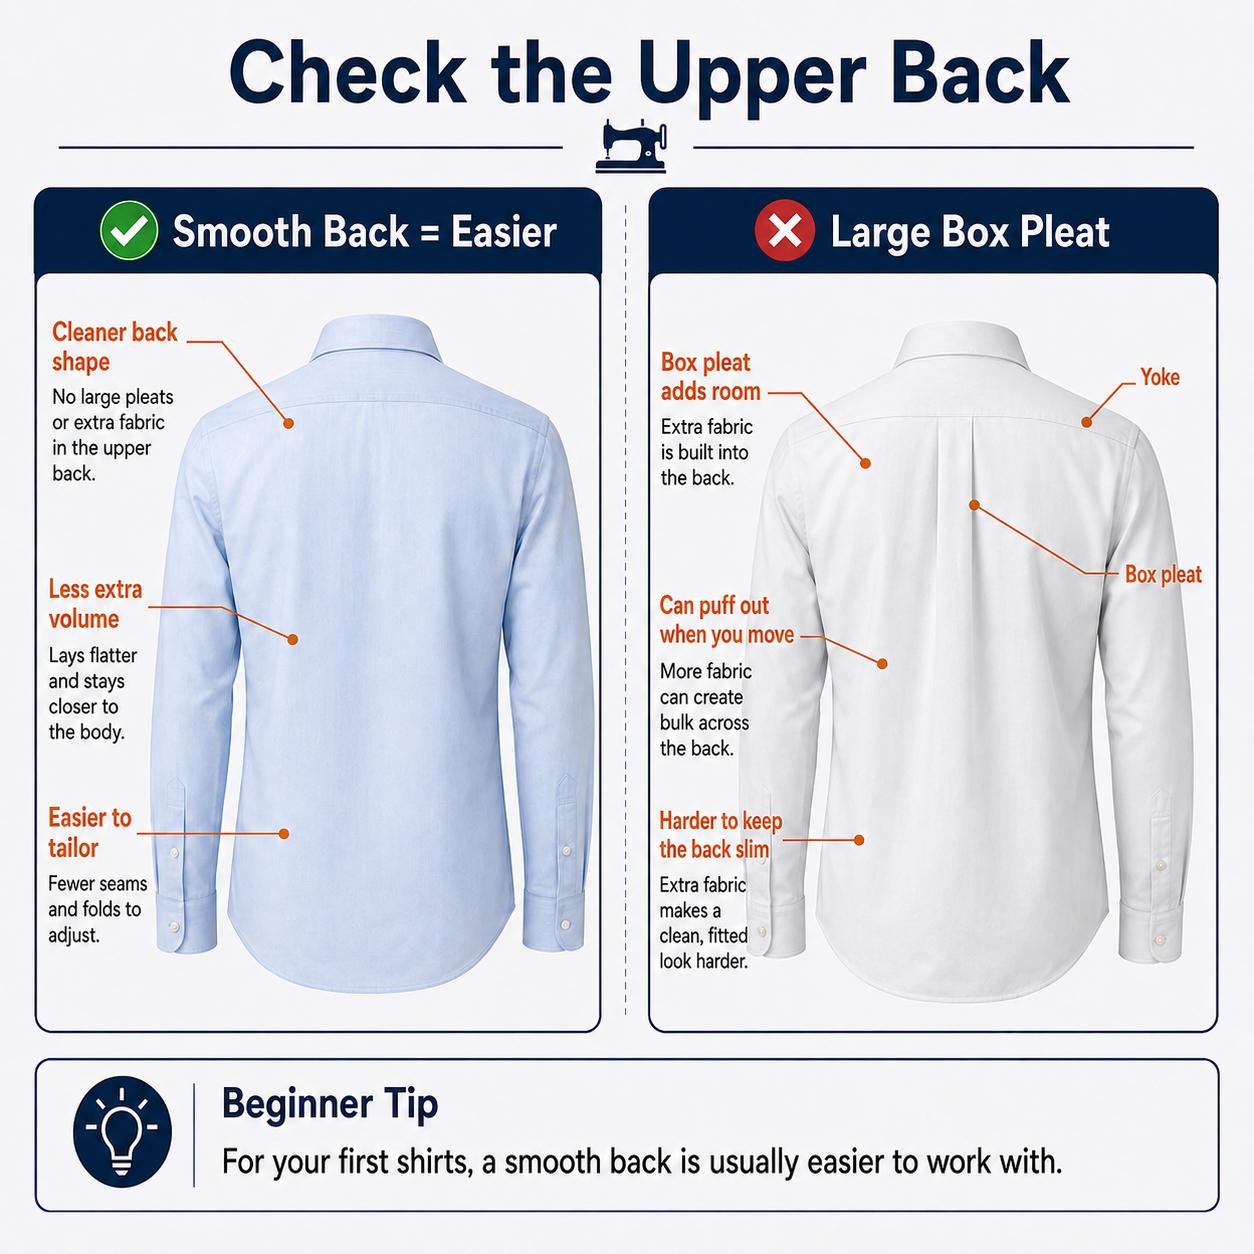
4. Check the Upper Back for a Box Pleat
Now turn the shirt around and look at the upper back. You might see a folded section of fabric in the middle, usually right below the upper-back panel. Sometimes there’s also a little loop above it. The folded fabric underneath it is called a box pleat.
What Does the Box Pleat Do?
It gives you extra room across your upper back. When you reach your arms forward or spread your shoulders, that folded fabric opens up and gives you more movement around your shoulder blades. So from a comfort standpoint, it actually perfect.
The problem comes when we start trying to make the shirt look slimmer, because it completely works against us in every way.
Why Can a Box Pleat Be Annoying?
Let’s say you take in your side seams. Maybe you add some darts too. Now your waist looks nice and fitted. The shirt follows your lower back perfectly. Everything looks streamlined.
And then you reach forward.
That box pleat opens up and suddenly you’ve got a big puff of fabric between your shoulder blades.
Now the bottom of the shirt looks fitted, while the top looks like you’ve got a hump back.
Nothing is technically wrong with the pleat.
It’s doing exactly what it was designed to do.
And thats the problem, we don’t want extra expansion. It’s kind of the opposite of what you want when you’re trying to create a more fitted back.
So What Exactly Are We Going to Alter?
If the shoulders, collar, and chest all fit but the waist is giving you muffin top, there are usually two main ways we’re going to fix it:
Side seams.
Darts.
And sometimes both.
Taking In the Side Seams
Your side seams run from underneath your arms down toward the bottom hem of the shirt.
Taking them in basically means sewing a new seam slightly farther inside the shirt. That removes the nonsense from each side and makes the entire body look slimmer.
This works really well when you’ve got extra fabric around pretty much the whole waist.
Remember:
We already like how the chest fits. So we don’t want to suddenly chop inward right below it. You want the new seam to gradually move inward as it travels toward the waist and move back out when we get to the chest.
Think smooth transition.
Not:
CHEST.
CLIFF.
WAIST.
We’re leaving the good part alone and blending it into the section we actually need to fix.
Adding Darts
Darts are by far one of my favorite alterations to do on any garment. They can make such a massive change that it sometimes blows my mind.
A dart is basically a narrow tapered fold that gets sewn into the back of the shirt.
It starts wider around the bottom, then gradually disappears once you sew up towards your scapula.
Instead of removing fabric from the outside edges of the shirt like the side seams do, darts remove fabric from the middle of the back and the lower.
This helps the shirt follow your actual body shape since your body obviously isn’t a giant flat rectangle. Taking in only the side seams is great, but I often recommend doing both that and adding darts. You don’t HAVE to, just my recommendation.
Unfortunately, a lot of mass-produced shirts are cut pretty damn close to one.
The Quick Dress Shirt Test
Before you tailor anything, put the shirt on and run through this little checklist.
Ask yourself:
Are the shoulder seams at least remotely close to the edges of my shoulders?
Can I button the collar up normally?
Can I fit about one or two fingers inside it? (Shut up)
Does the chest fit without the buttons pulling and gasping for air?
Can I reach forward without feeling like I’m wearing a straight jacket?
Is most of my extra fabric around the waist or lower back?
Does the shirt have a giant box pleat on the back?
If your shoulders, collar, and chest all fit and your biggest issue is just a baggy waist? You my friend found a really good shirt to tailor. So go nuts and have at it.
If your shoulders are too big, your collar doesn’t fit, AND your chest is wrong?
Put the sewing machine down.
That shirt has already made its decision.
Choose carefully and save yourself the hassle
This is probably the biggest thing I want you to take away from all of this.
Tailoring your own clothes gets WAY easier when you start with the right garments.
You’re not taking some completely wrong garment and magically turning it into a custom-made dress shirt.
You’re taking a shirt that already fits the difficult areas and just sanding off the edges.
Check the shoulders.
Button the collar.
Look at the chest.
Move your arms around.
Check the upper back.
If all of that looks pretty good and the main problem is a bunch of extra fabric around your waist?
Perfect.
Take in the sides.
Add some darts.
Maybe slim the sleeves.
And leave everything that already fits the hell alone.
The right starting shirt can make tailoring feel stupid easy.
The wrong shirt will have you staring at your sewing machine at 11:30 at night questioning your eyesight, your abilities, and whether or not it will penetrate all the way through your drywall.